How To Build a Birdhouse
Building a birdhouse is a simple woodworking project you can do with young children on a weekend. Here's how to do it with scrap wood.
by Jenn Largesse , This Old House DIY Expert & Editor, House One Updated 08/12/2024
Building a birdhouse can be a simple and rewarding woodworking project that the whole family can take on with just a few basic materials and tools. This project is perfect for using up scrap wood and introducing children to basic woodworking skills. In this video, This Old House expert Jenn Largesse demonstrates how to build a birdhouse with her young son Jack, showcasing how even young children can participate in this fun DIY project.
Materials Needed for a Birdhouse
Before starting your birdhouse project, gather the following materials:
- 1 x 6 board
- 1/4-inch plywood
- Exterior wood glue
- 1 1/4-inch nails
- Exterior wood filler
- Paint brush
- Rope or twine for hanging
- Sanding sponge
- Wood stain or exterior paint
Having these materials on hand will ensure a smooth building process and a durable final product.
Tools Required for a Birdhouse
You don’t need a lot of professional-level tools for this project, making it accessible for most homeowners. To construct your birdhouse, you’ll need the following tools:
- Drill/driver
- Drill bit (sized to match your chosen rope or twine for hanging)
- Hole saw or paddle bit
- Miter saw
- Nail gun
- Pliers
These tools will help you cut, assemble, and finish your birdhouse efficiently.
Preparing the Wood
Preparing the wood pieces correctly forms the foundation of a sturdy birdhouse. Before assembly, follow these steps:
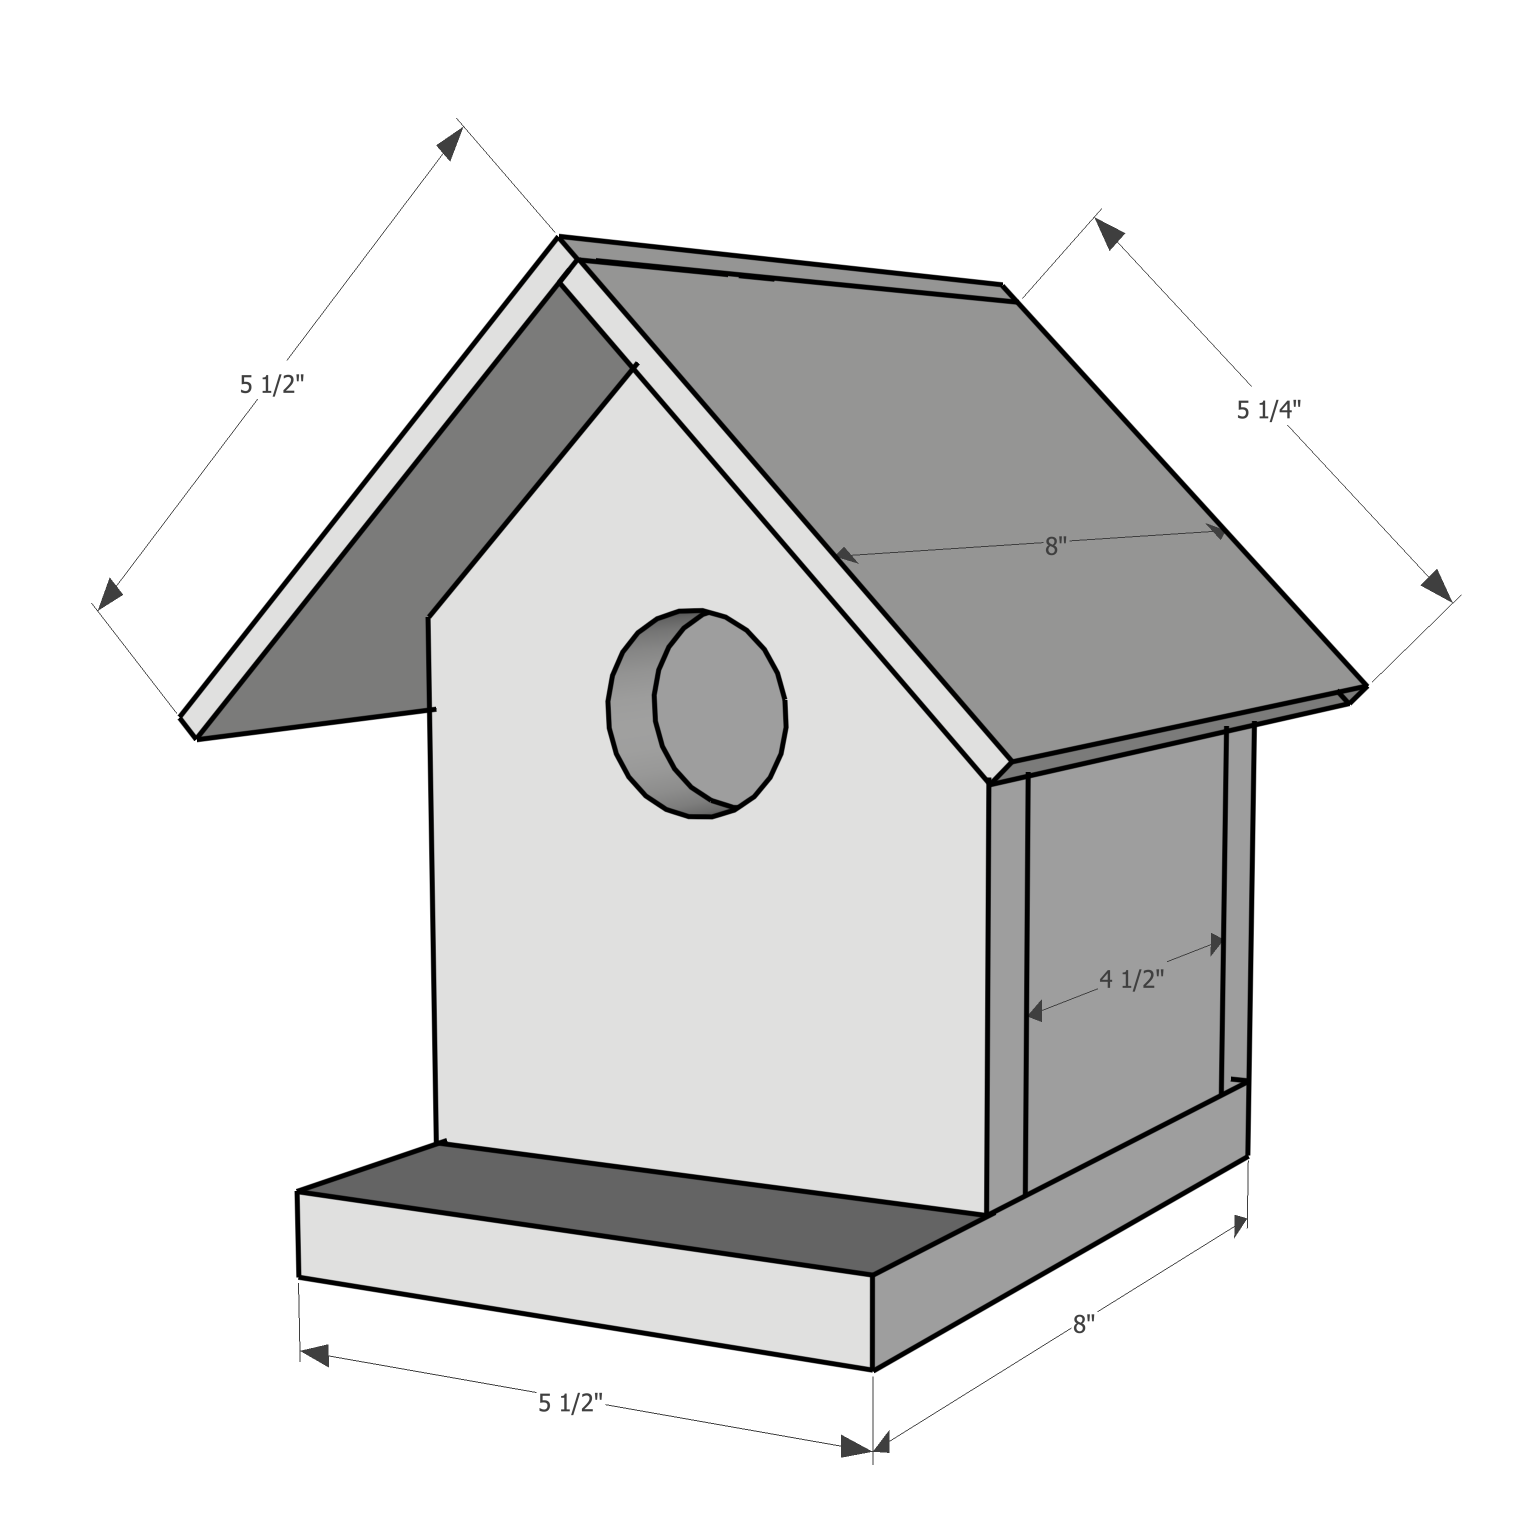
- Use a miter saw to cut the 1 x 6 board and 1/4-inch plywood according to the following measurements:
- Front and back walls: Two pieces at 7 1/2 inches
- Side walls: Two pieces at 4 3/4 inches high by 4 1/2 inches deep
- Base: One piece at 8 inches
- Roof panels: One piece at 8 inches deep by 5 1/2 inches wide, and one piece at 8 inches deep by 5 1/4 inches wide
- Mark the center point along the top edge of the front and back walls.
- From the center point, clip each top corner at a 45-degree miter to create a peak.

By pre-cutting all the parts, you can focus on the more engaging task of assembly, making it easier to have children help with the gluing and nailing process.
Create the Birdhouse Entrance
The birdhouse entrance helps attract the right species of birds. Here’s how to create it:
- Make a mark on the front board centered on its width, 3 1/2 inches from its peak.
- Using a hole saw, paddle bit, or jigsaw, create a hole that’s about 1 3/4 inches in diameter.
- Sand the edges of the hole to ensure it’s smooth and safe for birds.
A 1 3/4-inch diameter is suitable for most common backyard birds. Once smooth, this entrance will be inviting and safe for your feathery guests.
Assemble the Birdhouse
Now comes the fun part—putting everything together. Assemble the birdhouse by following these steps:
- Set the two side pieces on edge with a 4 3/4-inch-tall edge facing upward.
- Apply wood glue to each edge.
- Place the front piece onto the edges, ensuring the sides of the front are flush with the outside face of each wall.
- Use a nail gun to drive 1 1/4-inch brad nails through the face of the birdhouse and into the edge of each side wall.
- Flip the assembly and repeat the process for the back piece.
- Apply wood glue to the bottom edge of all four walls.
- Position the base so its back edge is flush with the back wall, and the front extends beyond the front wall to create a ledge.
- Nail through the base and into each adjoining wall.
Letting kids get in on the assembly can make it a memorable family activity. Even very young children can participate by helping to apply glue and place nails, while adults handle the more advanced tasks.
Attach the Roof to the Birdhouse
No birdhouse is complete without a roof. Secure the roof with these steps:
- Apply wood glue to the peak of the front and back walls.
- Place the shorter roof panel into place, flush with the tip of the peak.
- Nail through the roof and into the front and back walls to secure it.
- Position the second roof panel, overlapping the exposed top edge of the first panel.
- Nail through the roof and into the front and back walls to complete the assembly.
For added protection, Largesse suggests leaving the roof slightly longer on the front to provide shelter for birds perched on the entrance ledge.
Add Aesthetic and Functional Touches to Your Birdhouse
Your birdhouse is almost ready, but a few finishing touches will ensure it stands up to the elements and looks great in your backyard:
- Fill all nail holes with exterior-grade wood filler and allow it to dry.
- Sand the entire assembly smooth using a sanding sponge.
- Apply two coats of exterior paint or wood stain to protect the wood from the elements.
- Allow the finish to dry completely before hanging the birdhouse.
These final steps will make your birdhouse more visually appealing and extend its lifespan by protecting it from harsh weather conditions.
Hang the Birdhouse
Once your birdhouse is ready, hang it where birds feel safe. Various mounting options offer flexibility:
- Drill a hole in each side of the roof along the peak and thread a piece of twine through to create a hanging loop.
- Attach an exterior-grade hook to the top of the birdhouse.
- Place the birdhouse on a sturdy surface or mount it to a pole if hanging isn’t preferred.
Choose a location that’s safe from predators and sheltered from harsh weather conditions. Trees make an ideal spot, but ensure the birdhouse is well secured to prevent it from falling.
Birdhouse Maintenance
Regular maintenance will ensure the neighborhood birds will live happily in your birdhouse for years to come.
- Regular cleaning: Clean out the birdhouse annually to remove old nesting materials and inspect for damage.
- Repairs: Attend to any repairs promptly, such as securing loose nails or reapplying wood filler where needed.
- Seasonal checks: Before each nesting season, check for signs of wear and weather damage. Reapply exterior paint or stain as necessary to keep the wood protected.
By keeping your birdhouse in tip-top shape, you’re providing a safe and inviting home for birds year after year.
Birdhouse Variations
While the basic birdhouse design is easy to follow, there are several variations you can explore based on your wood scraps and the bird species you want to attract:
These customizations allow you to tailor your birdhouse to meet the needs of specific bird species, thereby attracting a more diverse array of feathered visitors to your yard.
Our Conclusion
Building a birdhouse is an excellent project for both novice and experienced DIYers. It’s a great way to introduce children to woodworking while creating a functional addition to your outdoor space. With simple materials and basic tools, you can craft a cozy home for local birds and enjoy watching them throughout the seasons.
Cut List:
- 1 x 6 front and back wall: two at 7 1/2 inches
- 1 x 6 side walls: two at 4 3/4 inches high by 4 1/2 inches deep
- 1 x 6 base: one at 8 inches
- 1/4-inch plywood roof panel: one at 8 inches deep by 5 1/2 inches wide
- 1/4-inch plywood roof panel: one at 8 inches deep by 5 1/4 inches wide
